WS2812B addressable RGB LEDs are great for indoor and outdoor decorating purposes. It would be a great choice if you want to control 1000s of RGB LEDs using a single data line. WS2812B RGB LED only needs a single data line to control all the LEDs connected in series.
In this tutorial, you will learn about WS2811, WS2812, and WS2812B addressable RGB LEDs and how to control them with Arduino.
Table of Contents
- 1 Difference Between WS2811, WS2812 and WS2812B
- 2 How Does WS2812B Work?
- 3 Power Requirement for WS2812B LED Strip
- 4 WS2812B Pinout
- 5 WS2812B Connection with Arduino
- 6 WS2812B Arduino Code
- 7 Setting RGB Colors
- 7.1 Example 1: set color from red, green, and blue components individually
- 7.2 Example 2: set the color from red, green, and blue components all at once.
- 7.3 Example 3: set color via ‘hex color code’ (0xRRGGBB)
- 7.4 Example 4: set color via any named HTML web color
- 7.5 Example 5: set color via setRGB
- 7.6 Copy the CRGB color from one pixel to another
- 8 Create Different Types of Effects
- 9 FastLED Color Palette
- 10 Create Custom Color Palette
- 11 Conclusion
Difference Between WS2811, WS2812 and WS2812B
There are various types of RGB LED drivers available, like WS2811, WS2812, WS2812B, SK6812, etc.
WS2811 is the old version with an external IC. It often comes with 12v packages.
WS2812 is nothing but WS2811 placed inside a 5050 LED package.
WS2812B is an improved version of WS2812. It inherited all the good qualities of WS2812 and improved the IC mechanically, further enhancing its stability and efficiency.
And SK6812 is a clone of WS2812B.
All of them will work roughly the same, but sometimes, you need to tweak the code a bit to make it work perfectly.
How Does WS2812B Work?
WS2812B has a control circuit and RGB chip integrated into a package of 5050 components. This package contains four pins – VCC, Ground, DIN, and DOUT.
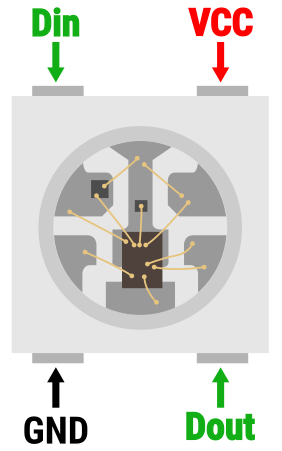
WS2812B has an internal digital latch and a signal-reshaping circuit. It also includes an electric reset circuit and a power lost reset circuit.
The data transfer protocol uses a single NZR communication mode. After the pixel gets the reset signal, the DIN port receives data from the controller. The first pixel collects the initial 24-bit data and sends it to the internal data latch. The other data is reshaped by the internal signal reshaping circuit and sent to the next cascade pixel through the Dout pin. After transmission for each pixel, the signal reduces to 24 bits.
Power Requirement for WS2812B LED Strip
WS2812 requires a 5v power supply and each LED needs approximately 60mA current at its full brightness. If your LED strip has 30 LEDs you need 60mA x 30 = 1800 mA or 1.8 Amp current. So you have to use a 5v power supply that has a current rating of 1.8 Amp or more.
WS2812B Pinout
WS2812B strip has three soldering pads at both ends. You can solder header pins, wires, or three-pin connectors at those soldering pads. At the start of the strip, it has VCC, Ground, and Din pins, and at the end of the strip, it has VCC, Ground, and Dout pins.

WS2812B Connection with Arduino
In this example, we will power the WS2812B LED strip using Arduino’s 5v output pin. Here we are using 8 LEDs. You can power up to 10-12 LEDs using Arduino’s 5v output pin. If you want to add more LEDs you should use an external power supply.

Here you can see that we provide a 5v power to the WS2812B RGB LED strip from Arduino. We connect the Arduino’s 5v output pin to the LED strip’s 5v pin and the Arduino’s ground to the strip’s ground pin. Then connect the data pin of the LED strip to Arduino pin no 3.
If you are using more than 10-12 WS2812B RGB LEDs you need to connect an external power supply. You can connect it like below.
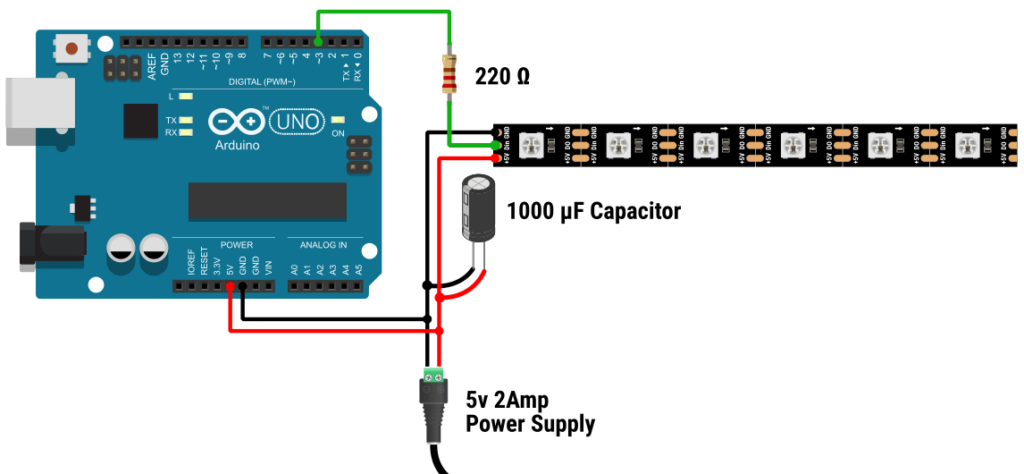
That’s it, now you can run any code from below.
WS2812B Arduino Code
We will use the FastLED library to control the WS2812B LED strip. You can install it manually by downloading it from the FastLED GitHub page and putting it into the Arduino library folder. Or you can install it using the Arduino IDE’s library management page.
To open the library management window, navigate to Tools > Manage Libraries.
Wait for the library manager to load properly. Then search “fastled”. You will find a couple of entries there. Select the right library and click Install.
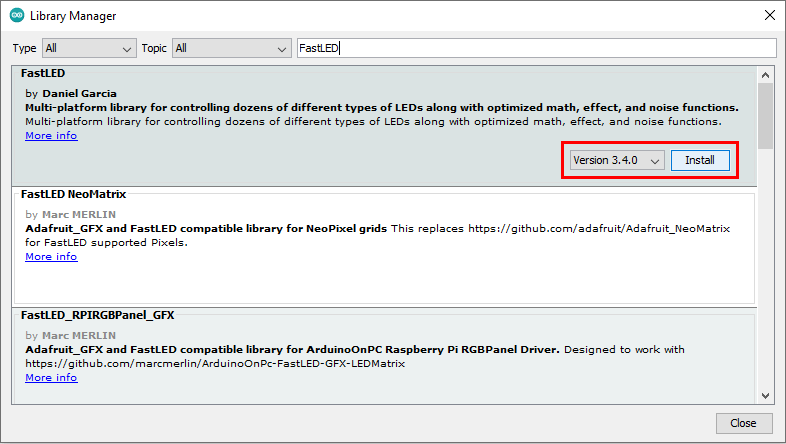
It will install the library. Now restart the Arduino IDE to load the library properly.
After installing the library properly, upload the below code to turn on the first three LEDs.
#include <FastLED.h>

#define DATA_PIN    3
#define NUM_LEDS    8
#define BRIGHTNESS  64
#define LED_TYPE    WS2812B
#define COLOR_ORDER GRB

// Define the array of leds
CRGB leds[NUM_LEDS];

#define UPDATES_PER_SECOND 100

void setup() {
  FastLED.addLeds<LED_TYPE, DATA_PIN, COLOR_ORDER>(leds, NUM_LEDS);
  FastLED.setBrightness(BRIGHTNESS);
}

void loop() {
  // Turn the LED on
  leds[0] = CRGB::Red;
  leds[1] = CRGB::Green;
  leds[2] = CRGB::Blue;
  FastLED.show();
  delay(10);
}
Explaining The Code
Here you can see that we first include the FastLED library. Then we define some variables to use them later. We will use the DATA_PIN variable to hold the Arduino pin number that is connected to the WS2812B led strip.
Similarly, we use NUM_LEDS to hold the number of the led that your led strip has.BRIGHTNESS to control the brightness of LEDs. You can set any brightness level between 0 to 255.
LED_TYPE will set the type of the LED driver.
led_type will set the type of the LED driver.
COLOR_ORDER will set the color sequence of your LED driver.
CRGB leds[NUM_LEDS]; will create an array named LEDs that can hold the RGB data for the number of LEDs you want.
Now in the setup section, we will set our led strip.
FastLED.addLeds<LED_TYPE, DATA_PIN, COLOR_ORDER>(leds, NUM_LEDS);This tells the library that we are using a WS2812B LED Strip that is connected to Arduino pin number 3, and the driver has a G-R-B led order. and the strip has 8 WS2812B RGB led.
Setting RGB Colors
We can set the RGB value of an LED in different ways. Here We will look at a few popular ones.
Example 1: set color from red, green, and blue components individually
leds[i].red =    50;
leds[i].green = 100;
leds[i].blue =  150;

// ...or, using the shorter synonyms "r", "g", and "b"...
leds[i].r = 50;
leds[i].g = 100;
leds[i].b = 150;
Example 2: set the color from red, green, and blue components all at once.
leds[i] = CRGB( 50, 100, 150);Example 3: set color via ‘hex color code’ (0xRRGGBB)
leds[i] = 0xFF007F;Example 4: set color via any named HTML web color
leds[i] = CRGB::HotPink;Example 5: set color via setRGB
leds[i].setRGB( 50, 100, 150);Copy the CRGB color from one pixel to another
leds[i] = leds[j];Create Different Types of Effects
In this section, we will create different types of effects in a separate function. And call them in the loop section. You can copy any function from there and use it in your WS2812B Arduino code.
Run the code below to show different effects.
#include <FastLED.h>
#define DATA_PIN 3
#define NUM_LEDS 12
#define BRIGHTNESS 10
#define LED_TYPE WS2812B
#define COLOR_ORDER GRB
// Define the array of leds
CRGB leds[NUM_LEDS];
#define UPDATES_PER_SECOND 100
void setup() {
FastLED.addLeds<LED_TYPE, DATA_PIN, COLOR_ORDER>(leds, NUM_LEDS);
FastLED.setBrightness(BRIGHTNESS);
}
void loop() {
ws2812_fill_all();
moving_three_led();
rgb_chasing();
}
void ws2812_fill_all() {
for (int i = 0; i < NUM_LEDS; i++) {
leds[i] = CRGB::Red;
delay(100);
FastLED.show();
}
for (int i = 0; i < NUM_LEDS; i++) {
leds[i] = CRGB::Black;
delay(100);
FastLED.show();
}
for (int i = 0; i < NUM_LEDS; i++) {
leds[i] = CRGB::Green;
delay(100);
FastLED.show();
}
for (int i = 0; i < NUM_LEDS; i++) {
leds[i] = CRGB::Black;
delay(100);
FastLED.show();
}
for (int i = 0; i < NUM_LEDS; i++) {
leds[i] = CRGB::Blue;
delay(100);
FastLED.show();
}
for (int i = 0; i < NUM_LEDS; i++) {
leds[i] = CRGB::Black;
delay(100);
FastLED.show();
}
}
void moving_three_led() {
for (int i = 0; i < NUM_LEDS; i++) {
leds[i] = CRGB::Red;
leds[i + 1] = CRGB::Green;
leds[i + 2] = CRGB::Blue;
FastLED.show();
delay(100);
for (int i = 0; i < NUM_LEDS; i++) {
leds[i] = CRGB::Black;
//delay(5);
}
}
}
void rgb_chasing() {
int ms = 100;
for (int i = 0; i < NUM_LEDS; i++) {
leds[i] = CRGB(100, 0, 0);
FastLED.show();
delay(ms);
}
for (int i = 0; i < NUM_LEDS; i++) {
leds[i] = CRGB(0, 100, 0);
FastLED.show();
delay(ms);
}
for (int i = 0; i < NUM_LEDS; i++) {
leds[i] = CRGB(0, 0, 100);
FastLED.show();
delay(ms);
}
}FastLED Color Palette
A palette is a lookup table that maps a single number between 0 and 255 to an RGB color. There are two main types of palettes, the older type is made from 16 colors, and the newer is gradient.
I find the gradient types most useful. So we’re going to start with these. We can define a gradient palette with the function shown below.
DEFINE_GRADIENT_PALETTE (heatmap_gp) {
    0,   0,   0,   0,   //black
  128, 255,   0,   0,   //red
  192, 255, 255,   0,   //bright yellow
  255, 255, 255, 255    //full white
};
Let’s look at the second line and you can see it’s made up of four numbers. The first number determines where the color is going to appear in your gradient and The next three numbers are the RGB values of the color that you want at that position.
The first number is zero so this is going to be right at the very start of the gradient. And the next three numbers are 0, 0, 0 so that’s going to be black in that position.
Similarly, you can see in the third line we put a red color (255, 0, 0) at position 128 in the gradient. At the fourth line, we put a yellow color (255, 255, 0) at position 200 in the gradient. At the last line, we put the full white color (255, 255, 255) at the end of the color palette (position 255).
Now here FirstLED does a great job, it takes the colors and the positions that you specified and it interpolates between them to make you a lovely smooth gradient.
The final color palette will look like this –

Now you can use that color palette in two ways. You can select a color from any position of the palette and use that color or you can use that complete palette to fill the LED strip.
Select a Color from Palette
leds [i] = ColorFromPalette(myPalette, index); – this will select the color from the index and fill the LED.
So as an example leds [1] = ColorFromPalette(myPalette, 200); will take the color from position 200 in my palette and fill that color in the fast LED of the strip.
The below example will show the complete code.
#include <FastLED.h>

#define DATA_PIN    3
#define NUM_LEDS    8
#define BRIGHTNESS  64
#define LED_TYPE    WS2812B
#define COLOR_ORDER GRB

CRGB leds[NUM_LEDS];

uint8_t paletteIndex = 0;

DEFINE_GRADIENT_PALETTE (heatmap_gp) {
  0,   0,   0,   0,     //black
  128, 255,   0,   0,   //red
  200, 255, 255,   0,   //bright yellow
  255, 255, 255, 255    //full white
};

CRGBPalette16 myPalette = heatmap_gp;

void setup() {
  FastLED.addLeds<LED_TYPE, DATA_PIN, COLOR_ORDER>(leds, NUM_LEDS);
  FastLED.setBrightness(BRIGHTNESS);
}

void loop() {
  leds [0] = ColorFromPalette(myPalette, 125);
  leds [1] = ColorFromPalette(myPalette, 170);
  leds [2] = ColorFromPalette(myPalette, 210);
  leds [3] = ColorFromPalette(myPalette, 255);
  FastLED.show();
}
Filling a number of LEDs with the Palette
You can use this function fill_palette to fill a number of LEDs with the Palette. It takes quite a few arguments.
fill_palette(leds, nLEDS, startIndex, incIndex, Palette, brightness, blendType);The first argument is leds, the array for the LED strip.
Then there are a number of LEDs. Put all the LEDs or the number of LEDs you want to fill.startIindex will determine the starting point from where you want to pick the color in the palette. So if you put the value 0 it will pick all the colors from 0 to 255 and 100 will pick all the colors from 100 to 255 in the palette. incIndex or Increment Index is how much we want to increase the index when we go from LED to LED.
Then you need to put the reference palette and the brightness.
In the end, you have blendType. The blend type can either be LINEARBLEND or NOBLEND.
fill_palette(leds, NUM_LEDS, paletteIndex, 255/NUM_LEDS, myPalette, BRIGHTNESS, LINEARBLEND);First I will define NUM_LEDS, paletteIndex, and BRIGHTNESS and then use the above line in the loop section to fill the strip.
#include <FastLED.h>

#define DATA_PIN    3
#define NUM_LEDS    8
#define BRIGHTNESS  64
#define LED_TYPE    WS2812B
#define COLOR_ORDER GRB

CRGB leds[NUM_LEDS];

uint8_t paletteIndex = 0;

DEFINE_GRADIENT_PALETTE (heatmap_gp) {
  0,   0,   0,   0,    //black
  128, 255,   0,   0,  //red
  200, 255, 255,   0,  //bright yellow
  255, 255, 255, 255   //full white
};

CRGBPalette16 myPalette = heatmap_gp;

void setup() {
  FastLED.addLeds<LED_TYPE, DATA_PIN, COLOR_ORDER>(leds, NUM_LEDS);
}

void loop() {
  fill_palette(leds, NUM_LEDS, paletteIndex, 255 / NUM_LEDS, myPalette, BRIGHTNESS, LINEARBLEND);
  FastLED.show();
}
Create Custom Color Palette
In the previous section, you learned how to create a color palette manually. Creating a color palette manually is quite boring.
Thankfully we have a good collection of color palettes here – soliton.vm.bytemark.co.uk/pub/cpt-city/index.html and we have the FastED PaletteKnife extension that will generate the color palette code automatically from those color palettes.
To generate a color palette from that collection we need to install the FastED PaletteKnife extension first.
Go to the FastED PaletteKnife extension page – fastled.io/tools/paletteknife/ and scroll down to the Installation section. There you will find the bookmarklet link, drag and drop this link to the bookmark bar. After successful installation, it will look like that.

Now, open a color palette from soliton.vm.bytemark.co.uk/pub/cpt-city/index.html. You will find some awesome color palettes in The most popular palettes section of that page. Here we will use the temperature palette from the cpt palette list. You can go directly to this link soliton.vm.bytemark.co.uk/pub/cpt-city/arendal/tn/temperature.png.index.html or find a palette you like. Then click on the PaletteKnife bookmark.
It will show some message, click on ok. It will show another message with a textbox like below.
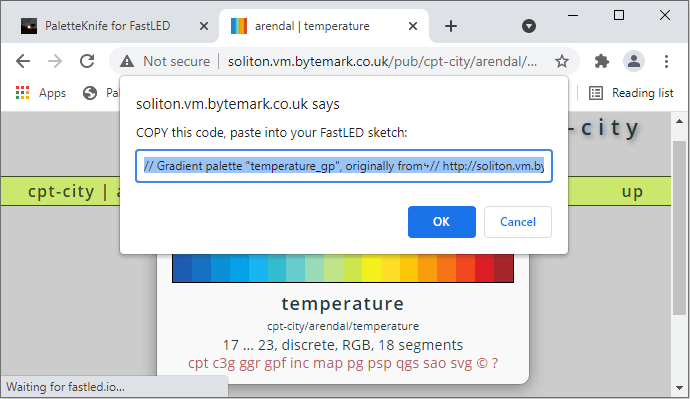
Copy the text from there and paste it above the setup section of your Arduino FastLED sketch.
// Gradient palette "temperature_gp", originally from
// http://soliton.vm.bytemark.co.uk/pub/cpt-city/arendal/tn/temperature.png.index.html
// converted for FastLED with gammas (2.6, 2.2, 2.5)
// Size: 144 bytes of program space.

DEFINE_GRADIENT_PALETTE( temperature_gp ) {
    0,   1, 27,105,
   14,   1, 27,105,
   14,   1, 40,127,
   28,   1, 40,127,
   28,   1, 70,168,
   42,   1, 70,168,
   42,   1, 92,197,
   56,   1, 92,197,
   56,   1,119,221,
   70,   1,119,221,
   70,   3,130,151,
   84,   3,130,151,
   84,  23,156,149,
   99,  23,156,149,
   99,  67,182,112,
  113,  67,182,112,
  113, 121,201, 52,
  127, 121,201, 52,
  127, 142,203, 11,
  141, 142,203, 11,
  141, 224,223,  1,
  155, 224,223,  1,
  155, 252,187,  2,
  170, 252,187,  2,
  170, 247,147,  1,
  184, 247,147,  1,
  184, 237, 87,  1,
  198, 237, 87,  1,
  198, 229, 43,  1,
  212, 229, 43,  1,
  212, 220, 15,  1,
  226, 220, 15,  1,
  226, 171,  2,  2,
  240, 171,  2,  2,
  240,  80,  3,  3,
  255,  80,  3,  3};
Now you can use that color palette as you like.
In the below example, we will use this color palette to fill the strip and create a moving effect.
#include <FastLED.h>

#define DATA_PIN    3
#define NUM_LEDS    8
#define BRIGHTNESS  64
#define LED_TYPE    WS2812B
#define COLOR_ORDER GRB

CRGB leds[NUM_LEDS];

uint8_t paletteIndex = 0;

DEFINE_GRADIENT_PALETTE( temperature_gp ) {
    0,   1, 27,105,
   14,   1, 27,105,
   14,   1, 40,127,
   28,   1, 40,127,
   28,   1, 70,168,
   42,   1, 70,168,
   42,   1, 92,197,
   56,   1, 92,197,
   56,   1,119,221,
   70,   1,119,221,
   70,   3,130,151,
   84,   3,130,151,
   84,  23,156,149,
   99,  23,156,149,
   99,  67,182,112,
  113,  67,182,112,
  113, 121,201, 52,
  127, 121,201, 52,
  127, 142,203, 11,
  141, 142,203, 11,
  141, 224,223,  1,
  155, 224,223,  1,
  155, 252,187,  2,
  170, 252,187,  2,
  170, 247,147,  1,
  184, 247,147,  1,
  184, 237, 87,  1,
  198, 237, 87,  1,
  198, 229, 43,  1,
  212, 229, 43,  1,
  212, 220, 15,  1,
  226, 220, 15,  1,
  226, 171,  2,  2,
  240, 171,  2,  2,
  240,  80,  3,  3,
  255,  80,  3,  3};

CRGBPalette16 myPalette = temperature_gp;

void setup() {
  FastLED.addLeds<LED_TYPE, DATA_PIN, COLOR_ORDER>(leds, NUM_LEDS);
  FastLED.setBrightness(BRIGHTNESS);
}

void loop() {
  fill_palette(leds, NUM_LEDS, paletteIndex, 255 / NUM_LEDS, myPalette, BRIGHTNESS, LINEARBLEND);
    // Creates a moving effect
    EVERY_N_MILLISECONDS(10) {
      paletteIndex++;
      }
  FastLED.show();
}
Conclusion
In this tutorial, you have learned how to connect a WS2812D RGB LED strip with Arduino and how to control them in different ways. I hope you find this tutorial very useful. To get more content like this, subscribe to our weekly newsletter.
Also, use the comment section below to share your ideas and projects related to WS2812B RGB LEDs.


Hi,
Thanks for the great guide, very helpful.
I have a quick question.
When I use “ColorFromPalette(myPalette, 255);” I don’t get bright white from the predefined color, but instead the pixel is “fading” towards the first index color again (in this case black)
I get the full white at index ~240. Any idea why that is?
Thanks so much.
I’m currently using only one 5mm Neopixels on an Arduino Nano with the example code provided above
Never mind,
It’s a result of the LINEARBLEND attribute. If I set it to NOBLEND it behaves as expected.
Thanks again
Glad to know that you found the solution.
How can I get moving_three_led to follow it’s self, rather than trailing black? I have a ring of LED’s and would like it to be continuous.
This code should work.