After a few days of working with Arduino, you will realize that although the delay() function is easy to use it has some drawbacks. If you use delay() in a program it will stop all activity on the Arduino until the delay is finished. You cannot perform any other task at that time period.
The solution to this problem is to use millis() in your code. millis() returns the number of milliseconds passed since the Arduino board is powered up or reset.
In this tutorial, I will discuss millis() function in detail and different use cases of millis() function.
Table of Contents
Arduino millis()
Arduino has a built-in function millis() to track the time in milliseconds. It returns the number of milliseconds passed since the Arduino started running the program. You can store it in a variable like this –
currentMillis = millis()The variable you used to store the time should be an unsigned long.
The below code will demonstrate how to use millis() function in an Arduino sketch. It will print the time (in milliseconds) passed since the Arduino started running the program.
unsigned long currentMillis;

void setup() {
  Serial.begin(115200);
}
void loop() {
  currentMillis = millis();
  Serial.print("Time: ");
  Serial.println(currentMillis); // prints time since program started
}
Open the serial monitor in the Arduino IDE and you will find the output.
In order to use millis() for the timing, the program needs to know the current time value at least once in the loop(). We also need another two variables. One variable to store the time at which an action took place and another variable to set the time period of that action.
The below image will illustrate the complete operation.

First, you need to record the time at which the action took place then check continuously whether the required period has elapsed. If so, do something that you want to do.
void loop() {
  currentMillis = millis();
  if ((ledState == HIGH) && (currentMillis - previousMillis >= period)) {

    [do whatever you want to do]

    previousMillis = currentMillis;  // Remember the time
  }
Arduino micros()
micros() returns the number of microseconds passed since the Arduino started running the program. If you need more precise time you should use micros(). But keep it in mind that this number will overflow (go back to zero) very quickly, after approximately 71 minutes.
In the below sections, I will show you different use cases of millis() function. If you want to use micros() just replace the millis() with micros() in the code.
Blink an LED using Arduino millis()
In this section, I will show you how to blink an LED without delay. I will use the millis() function to do that.
For this example, you need to add an LED to the Arduino board. You can add an LED to the Arduino by following the below circuit or reading my Arduino LED tutorial.
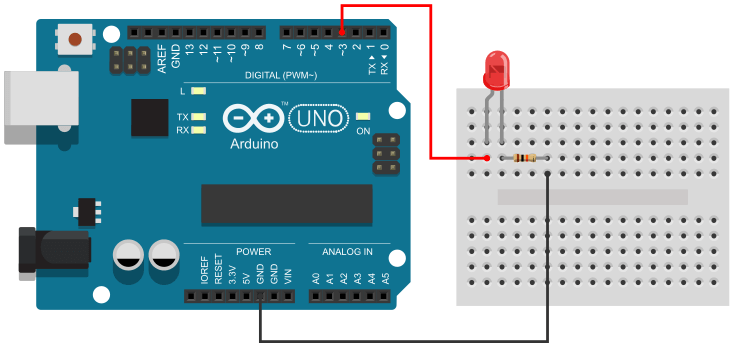
Now upload the below code to your Arduino board. It will blink the LED with a 500 ms (1/2s) interval.
unsigned long currentMillis;
unsigned long previousMillis = 0;
const unsigned long period = 500;
const byte ledPin = 11;
int ledState = LOW;

void setup() {
  pinMode(ledPin, OUTPUT);
}

void loop() {
  currentMillis = millis();
  if (currentMillis - previousMillis >= period) {
    ledState = !ledState;
    digitalWrite(ledPin, ledState);
    previousMillis = currentMillis;
  }
}
Explaining the Code
Here you can see that I declare some variables that I used later. currentMillis is used to store the current time. previousMillis is used to set the starting point of an event and period is used to set the duration of that event.
ledPin is used to hold the Arduino pin number that is connected to the LED. ledState will hold the state of the LED. Initially, I set it to LOW.
In the setup section, I set the led pin as an output pin. Then in the loop section, I read the current time using millis() and store that time in the currentMillis. Now in an if condiction I check if the currentMillis exceed the duration of the event from the previousMillis then change the state of the LED. Set the currentMillis as previousMillis so that we can start counting from that point.
In the above code, the LED will turn on and turn off for the same time duration. You can control the on-time and off-time separately using the below code.
unsigned long currentMillis;
unsigned long previousMillis = 0;
const unsigned long OnTime = 100;
const unsigned long OffTime = 800;
const byte ledPin = 11;
int ledState = LOW;

void setup() {
  pinMode(ledPin, OUTPUT);
}

void loop() {
  currentMillis = millis();
  if ((ledState == HIGH) && (currentMillis - previousMillis >= OnTime)) {
    ledState = LOW;  // Turn it off
    previousMillis = currentMillis;  // Remember the time
    digitalWrite(ledPin, ledState);  // Update the actual LED
  }
  else if ((ledState == LOW) && (currentMillis - previousMillis >= OffTime)) {
    ledState = HIGH;  // turn it on
    previousMillis = currentMillis;   // Remember the time
    digitalWrite(ledPin, ledState);   // Update the actual LED
  }
}
Blinks LEDs at Different Rate
I am sure all of you use the Arduino blink sketch to blink an LED. After playing with the blink sketch for some time you will realize that you cannot blink multiple LEDs at different rates.
Here I will show you how you can blink multiple LEDs at different rates. So for that, you need to add 3 LEDs to the Arduino.
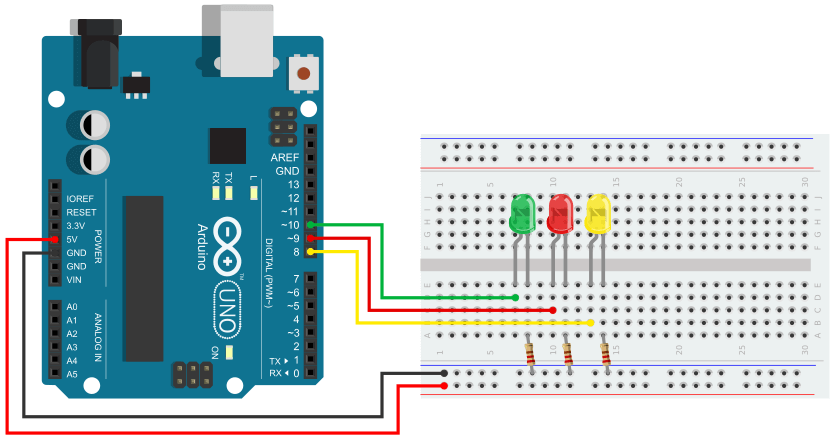
int LED1_PIN = 8;
int LED1_STATE = LOW;
int LED1_INTERVAL = 200;
unsigned long LED1_previousMillis = 0;

int LED2_PIN = 9;
int LED2_STATE = LOW;
int LED2_INTERVAL = 400;
unsigned long LED2_previousMillis = 0;

int LED3_PIN = 10;
int LED3_STATE = LOW;
int LED3_INTERVAL = 800;
unsigned long LED3_previousMillis = 0;

unsigned long currentMillis;

void setup() {
  Serial.begin(115200);
  pinMode(LED1_PIN, OUTPUT);
  pinMode(LED2_PIN, OUTPUT);
  pinMode(LED3_PIN, OUTPUT);
}

void loop() {
  currentMillis = millis();

  if (currentMillis - LED1_previousMillis >= LED1_INTERVAL) {
    LED1_STATE = !LED1_STATE;
    digitalWrite(LED1_PIN, LED1_STATE);
    LED1_previousMillis = currentMillis;
  }
  if (currentMillis - LED2_previousMillis >= LED2_INTERVAL) {
    LED2_STATE = !LED2_STATE;
    digitalWrite(LED2_PIN, LED2_STATE);
    LED2_previousMillis = currentMillis;
  }
  if (currentMillis - LED3_previousMillis >= LED3_INTERVAL) {
    LED3_STATE = !LED3_STATE;
    digitalWrite(LED3_PIN, LED3_STATE);
    LED3_previousMillis = currentMillis;
  }
}
Limitations of millis() and micros()
Arduino millis() count the time in milliseconds and we can store that data in an unsigned long variable. The maximum value of an unsigned long variable can be 232 – 1 or 4,294,967,295. And there are 1,000 milliseconds in a second. So we can count up to 49.71 days [4,294,967,295/(1000*3600*24)] continuously after that it will reset to 0. This can become a problem for some projects.
micros() counts in microseconds and there are 1000,000 microseconds in a second. So if you use micros() it can count up to 71.5 minutes continuously.


