Push-button is a key component in most electronics projects. It is a very simple and useful component to add user interaction to your project. I am sure all of you used a push button before in day-to-day life. For example, a tv remote has push buttons to change channels and volume.
In this tutorial, I will show you how to use a push button with Arduino. I have used some LEDs to show the output of the buttons. I will use the button to change the brightness of an LED and the frequency of a blinking LED.
Table of Contents
- 1 Push Button Overview
- 2 How to Connect a Push Button with Arduino
- 3 Arduino Push Button Code
- 4 Button Press Detection
- 5 Button State Change Detection
- 6 Arduino Push Button Counter
- 7 Driving Multiple LEDs using Push Button
- 8 Control The Brightness of an LED using Buttons
- 9 Change The Frequency of a Blinking LED
Push Button Overview
Push buttons come in different shapes and sizes. But the internal structure and working principle are the same for most push buttons.
Push buttons usually have four pins. But these pins are connected internally in pairs. So actually you have two connections. When you press the button these two terminals will connect together. And when you release the button these terminals will disconnect.

In the above image, you can see the schematic of a push button. It has two terminals marked 1 and 2. When you press the button terminal 1 and 2 will connect together.
How to Connect a Push Button with Arduino
Connecting a push button with an Arduino is very simple. Connect one terminal of the push button to the ground pin and another terminal to any Arduino digital pins. Here you have to use a pull-up resistor (10k Ω) to keep the voltage HIGH when you are not pressing the button.
The pullup resistor is nothing but a high-value resistor connecting to the Arduino digital pin you are using with the HIGH (5v) voltage. Know more about the pullup resistor here – Arduino pullup Resistor
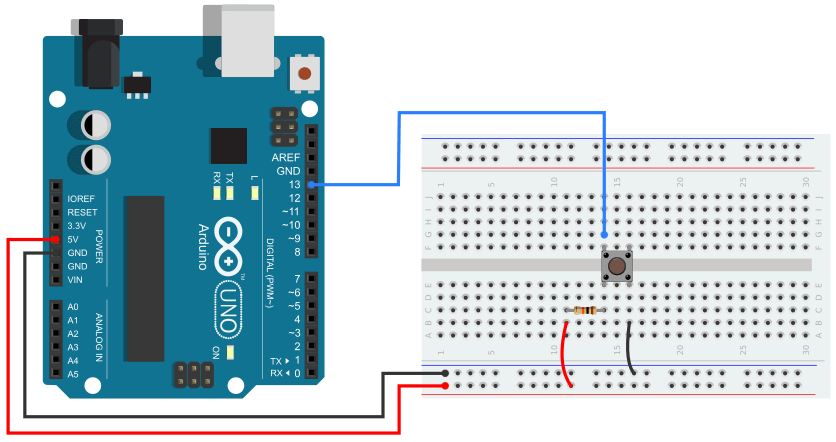
Note that – If you use a pull-up configuration the button input pin gets logic HIGH input when you are not pressing the button. And when you press the button it gets logic LOW input.
Arduino Push Button Code
Push button has two states – HIGH and LOW. So you can use the digitalRead() function to read the button state. Here I am using a pullup resistor. That means the button output is HIGH when not pressed and LOW when the button is pressed.
Push buttons have mainly three widely used cases –
1 – Button state detection
2 – Button state change detection
3 – Button press count
If you want a LED to be ON when the button is pressed and OFF when the button is not pressed then you need to detect the button state only.
If you want to toggle the LED between ON and OFF with each button press then you need to detect the button state change.
And if you want to increase or decrease the brightness of an led or if you want to control multiple led using one button you will need to count the button press.
In the below sections, I will use all three cases with different examples.
Button Press Detection
In this section, I will show you how to detect the button state. I will use an LED to show the output. The LED will turn on when you press the button and it will remain on as long as you hold the button. The LED will turn off when you release the button.
For this example, you need to make a small circuit like below. You can see that I connect an LED and a button with the Arduino. LED’s +ve pin is connected to the Arduino pin number 9 and the ground pin is connected to the ground through a 220 Ω current limiting resistor. The button is connected to Arduino pin number 13.
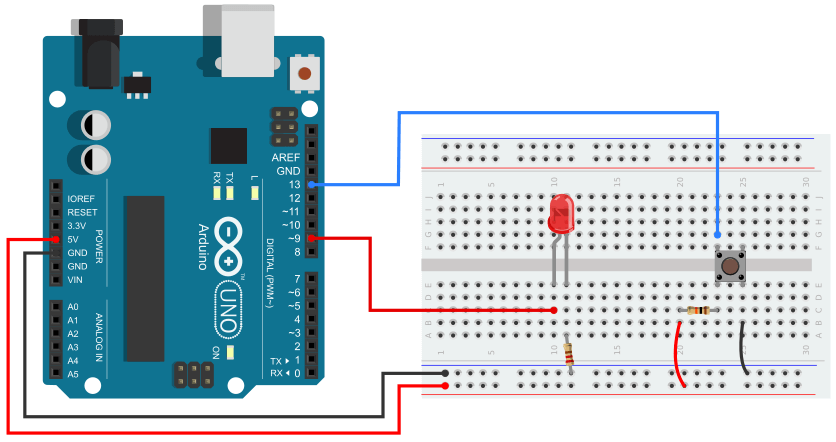
Now upload the below code and press the button. See how it works.
Arduino Code
const int buttonPin = 13;
const int ledPin = 9;

void setup() {
  pinMode(ledPin, OUTPUT);
  pinMode(buttonPin, INPUT);
}

void loop() {
  currentState = digitalRead(buttonPin);
  if (currentState == LOW) {
    digitalWrite(ledPin, HIGH);
  }
  else if (currentState == HIGH) {
    digitalWrite(ledPin, LOW);
  }
  delay(50);
}
Button State Change Detection
In this section, I will show you how to detect the push button state change. The below code will detect the point when the button output goes from HIGH to a LOW state. That means it will only detect the button press, not the button release. You can use that event to control many things.
This example will work on the previous circuit. So you don’t need to change the circuit. Just upload the below code, press the button multiple times and see how it works.
The below code will toggle an LED every time the button is pressed.
Arduino Code
const int buttonPin = 13;
const int ledPin = 9;
int currentState;
int lastState = HIGH;
int ledState = LOW;
void setup() {
  Serial.begin(9600);
  pinMode(ledPin, OUTPUT);
  pinMode(buttonPin, INPUT);
}

void loop() {
  currentState = digitalRead(buttonPin);

  if (lastState == HIGH && currentState == LOW) {
    ledState = !ledState;
    digitalWrite(ledPin, ledState);
  }
  lastState = currentState;
  delay(50);
}
Arduino Push Button Counter
In some projects, you need to count the button press. For example, if you want to increase the brightness of an LED step-wise every time you press the button or if you want to increase/decrease the speed of a motor with a button input.
In this section, I will show you how to count the button presses. The below code will count the button press from 0-10 and then reset the counter. You can see the output on the Arduino serial monitor. In the below sections you can see the practical uses of the push-button counter.
Arduino Code
const int buttonPin = 13;
int currentState;        // variable for reading the pushbutton status
int pushCounter = 0;     // counter for the number of button presses
int lastState = HIGH;    // previous state of the button

void setup() {
  Serial.begin(9600);
  Serial.println("Push Button Counter");
  Serial.println(" ");
  pinMode(buttonPin, INPUT);
}

void loop() {
  currentState = digitalRead(buttonPin);
  if (currentState != lastState) {
    if (currentState == LOW) {
      pushCounter++;
      Serial.print("Button Press Count = ");
      Serial.println(pushCounter);
    }
  }
  lastState = currentState;
  if (pushCounter >= 10) {
    Serial.println(" ");
    Serial.println("Resettng the Counter...");
    pushCounter = 0;
  }
  delay(50);
}
Upload the above code to the Arduino board and open the serial monitor. You will see the button press count.
Driving Multiple LEDs using Push Button
In this section, I will use a push button to drive four LEDs. Every time you press the button a different LED will turn on and all other LEDs will be turned off.
For this example, you will need a small circuit like below. You have to connect four LEDs and a button with the Arduino board. You can follow the below circuit –
Take four LEDs and connect their +ve pin to the Arduino pin numbers 8, 9, 10, and 11. Connect their -ve pin to the ground through a current limiting resistor (220 Ω). Use a separate resistor for each LED. Now connect a button to Arduino pin number 13.
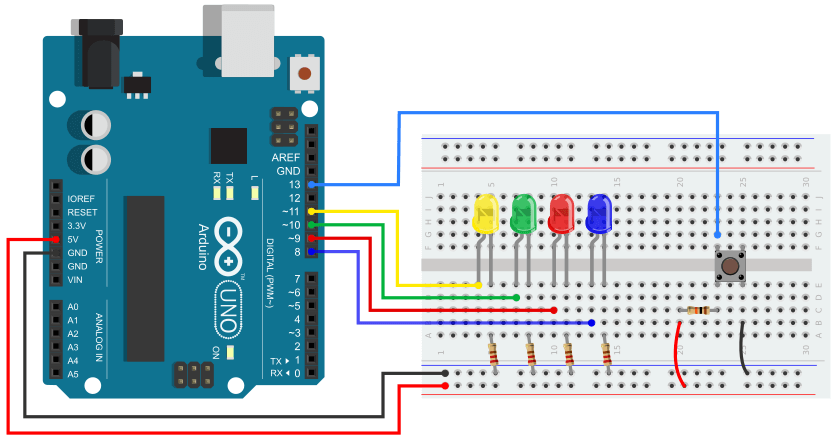
Upload the below code and press the button to see the output.
Arduino Code
int ledPin[4] = {8, 9, 10, 11};

const int buttonPin = 13;
int buttonState = HIGH;
int pushCounter = 0;
int numberOfLED = 4;
void setup() {
  pinMode(buttonPin, INPUT);
  for (int i = 0; i <= 4; i++) {
    pinMode(ledPin[i], OUTPUT);
  }
}

void loop() {
  buttonState = digitalRead(buttonPin);
  if (buttonState == LOW) {
    for (int i = 0; i < numberOfLED; i++) {
      if (pushCounter % numberOfLED == i) {
        digitalWrite(ledPin[i], HIGH);
      }
      else {
        digitalWrite(ledPin[i], LOW);
      }
    }
    pushCounter++;
    delay(400);
  }
}
Control The Brightness of an LED using Buttons
In this section, I will use two buttons to control the brightness of an LED. One button will increase the brightness and another will decrease the brightness of the LED.
Here you need to make a small circuit like below. Connect the two buttons input to the Arduino pin 12 and 13. Connect the LED +ve pin to Arduino pin 9 and the -ve pin to the ground using a current limiting resistor (220 Ω).
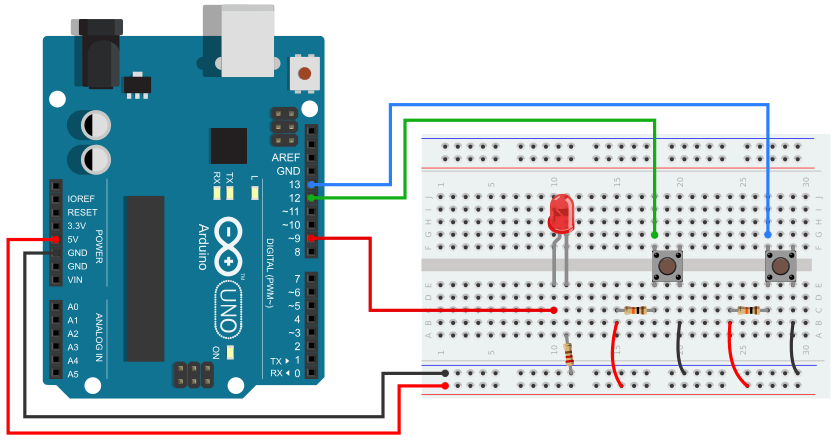
const int ledPin = 9;
const int buttonPin1 = 12; // Increment Button
const int buttonPin2 = 13; // Decrement Button

int lastState1 = HIGH; // the previous state from the input pin
int lastState2 = HIGH;
int pushCounter = 0;  // counter for the number of button presses
int currentState1, currentState2;     // the current reading from the input pin
int fadeValue = 0;

void setup() {
  pinMode(ledPin, OUTPUT);
  pinMode(buttonPin1, INPUT);
  pinMode(buttonPin2, INPUT);
}

void loop() {
  currentState1 = digitalRead(buttonPin1);
  currentState2 = digitalRead(buttonPin2);
  if (currentState1 != lastState1) {
    if (currentState1 == LOW) {
      pushCounter++;
      fadeValue = pushCounter * 32;
    }
  }
  lastState1 = currentState1;

  if (currentState2 != lastState2) {
    if (currentState2 == LOW) {
      pushCounter--;
      fadeValue = pushCounter * 32;
    }
  }
  lastState2 = currentState2;

  analogWrite(ledPin, fadeValue);

  if (pushCounter >= 8) {
    pushCounter = 0;
  }
  delay(50);
}
Change The Frequency of a Blinking LED
In this section, I will show you how you can change the frequency of a blinking LED with a button press. I will use two buttons, one button will increase the frequency and another button will decrease the frequency of the blinking LED.
The circuit for this example is the same as the above circuit. So just upload the below code and press the buttons to see the output.
const int ledPin = 9;
const int buttonPin1 = 12; // increase the counter
const int buttonPin2 = 13; // Decrease the counter

int lastState1 = HIGH; // the previous state from the input pin
int lastState2 = HIGH;
int currentState1, currentState2;     // the current reading from the input pin
int pushCounter = 0;  // counter for the number of button presses
int delay_t = 100;
int ledState = LOW;

void setup() {
  pinMode(ledPin, OUTPUT);
  pinMode(buttonPin1, INPUT);
  pinMode(buttonPin2, INPUT);
}

void loop() {
  currentState1 = digitalRead(buttonPin1);
  currentState2 = digitalRead(buttonPin2);
  if (currentState1 != lastState1) {
    if (currentState1 == LOW) {
      pushCounter++;
    }
  }
  lastState1 = currentState1;

  if (currentState2 != lastState2) {
    if (currentState2 == LOW) {
      pushCounter--;
    }
  }

  delay_t = 100 + pushCounter * 100;
  blink_without_delay(delay_t);

  lastState2 = currentState2;
  if (pushCounter >= 10) {
    pushCounter = 0;
  }
  else if (pushCounter < 0) {
    pushCounter = 0;
  }
  delay(50);
}

unsigned long previousMillis = 0; // will store last time LED was updated
void blink_without_delay(long interval) {
  unsigned long currentMillis = millis();
  if (currentMillis - previousMillis >= interval) {
    ledState = !ledState;
    digitalWrite(ledPin, ledState);
    previousMillis = currentMillis;
  }
}