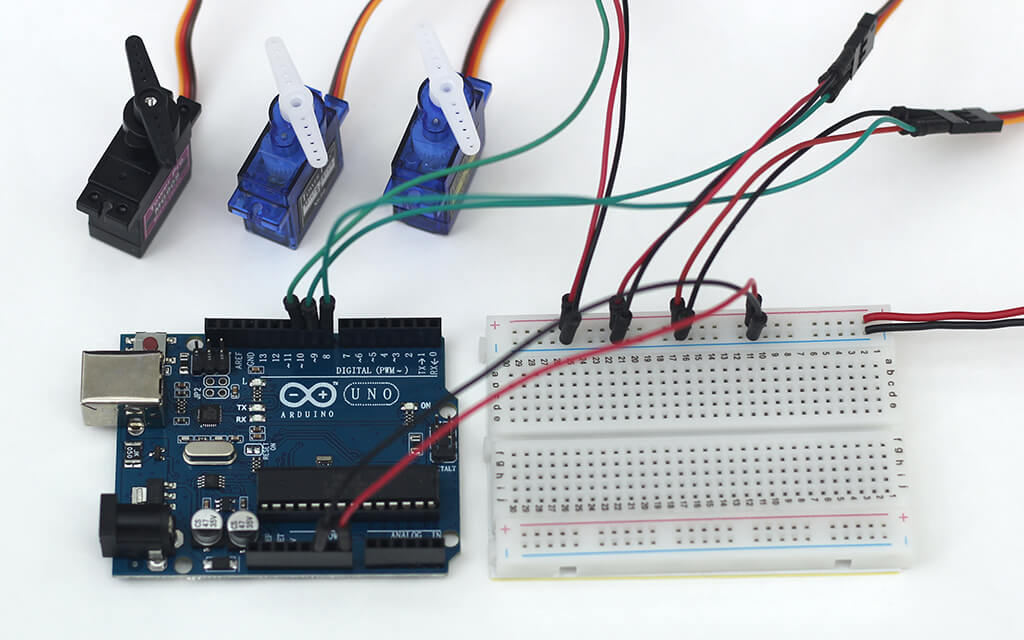
Servo motors are a great fit for projects that require precise movement of things. Usually, they have a servo arm that can rotate up to 180 degrees or 360 degrees. These motors require a control signal to determine the position of their arm.
Servo motors are often used in robotics to control the direction and position of a robotic arm, control the steering of Remote Control (RC) cars, and adjust the aileron angle in RC planes.
In this tutorial, you will learn how to control a servo motor using an Arduino. First I will show you how to sweep the servo back and forth automatically and then I will add a pot to control the position of the servo.
Table of Contents
How Servo Motors Works
A standard servo motor has four main components: an electric motor, a gearbox, a potentiometer, and a control circuit.
Generally, a motor has high speed and low torque, a gearbox is used to reduce the speed and increase the motor’s torque. A potentiometer is attached at the back of the output shaft so that it can monitor the position of the output shaft.
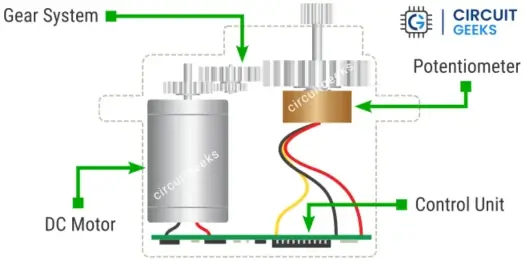
Servo motors require an input signal to determine the position of their arm. The control circuit interprets the input signal and determines how much movement is required.
The circuit has a closed-loop control system that uses potentiometer reading as position feedback. The final position is determined based on the position feedback.

Servo Motor Control Signal
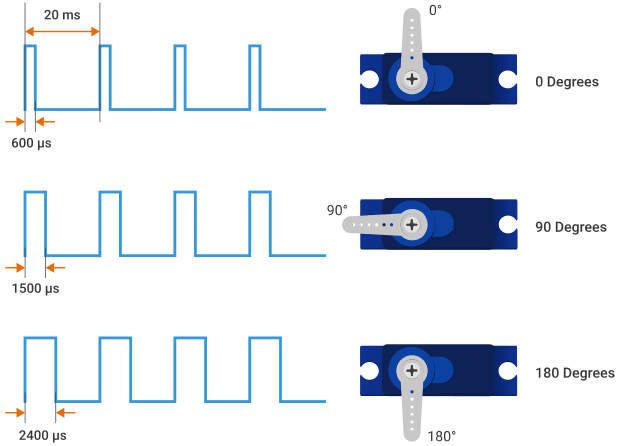
Servo motors require a PWM signal to set the position of the servo arm. A 20 ms pulse cycle is necessary to run a servo motor. The width of the pulse determines the position of the servo arm.
Some datasheets mention that the working pulse width is from 1 millisecond to 2 milliseconds, while others mention it as 500 to 2400 microseconds.
After some experiments, I found that the 600 to 2400 microseconds work best for my servo (Tower Pro SG90). That means a 600 μs pulse duration will set the servo to the 0-degree position and 2400 μs will set it at the 180-degree position.
From there you can calculate the pulse duration for any required position. The below image demonstrates the relation between the pulse duration and the servo motor positions.
Servo Motor Pinout
Most servo motors have 3 wires: VCC, Ground, and Signal.
- VCC – supplies the electric current to the motor, usually colored red.
- Ground – completes the electrical circuit, typically colored with brown or black.
- Signal – carries the control signal, usually colored orange or yellow.
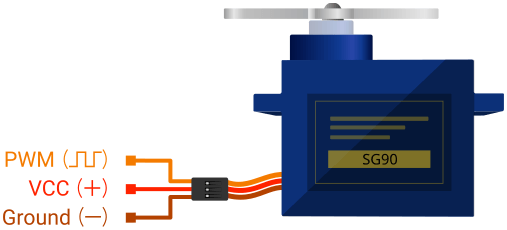
It’s important to note that the color coding mentioned above is from Tower Pro micro servo sg90 and mg90s motor. Color coding can vary in different models. If you aren’t sure about your particular servo, see the manufacturer’s datasheet for accurate information.
Powering Servo Motors
When a servo motor stands still it doesn’t take very much energy. As soon as the motor starts moving, it uses more energy by pulling more current from the power source. If it experiences a heavier load it needs more power and will consume more current.
Servo motors have different power requirements depending on their size and workload capacity. So before going any further, you should know how much power supply your project requires.
A common servo motor such as a TowerPro SG90 has a 650 +/- 80 mA stall current and works at 4.0 to 7.2 volts. If you require maximum stall torque, go for a 7.2-volt power supply, but here I will use a 5-volt power supply for convenience.
The current rating of the power supply should be greater than the stall current of the servo × number of servos used. For example, if you use 5 servos you should use a 3.5 amp (650 mA × 5 = 3.25 Amp) power supply.
You could go for a lower current rating if your projects don’t require all the motors to be turned on simultaneously. In such cases, it’s important to know the maximum number of servo motors that might be active at any given time and select the power supply accordingly.
Arduino Servo Motor Circuit
Most Arduino boards, including the Arduino Uno, can only handle 450-500 mA current. So we should not power a servo directly from the Arduino board for a complete project. However, it is feasible to power a single SG90 servo motor from the Arduino for testing purposes.
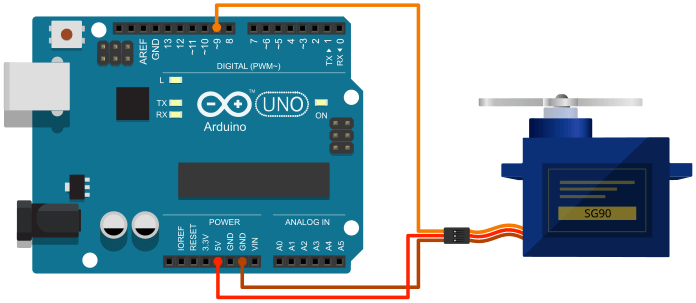
Connecting a servo to the Arduino is very easy. First I will show how you can connect a servo to the Arduino and then I will show you how to use an external power supply to run the motor/s.
To connect a servo to the Arduino, connect the servo VCC pin to the Arduino 5V output pin and the servo GND pin to the Arduino ground pin. Now connect the servo signal pin to any Arduino digital pin, here I will use PIN 9.
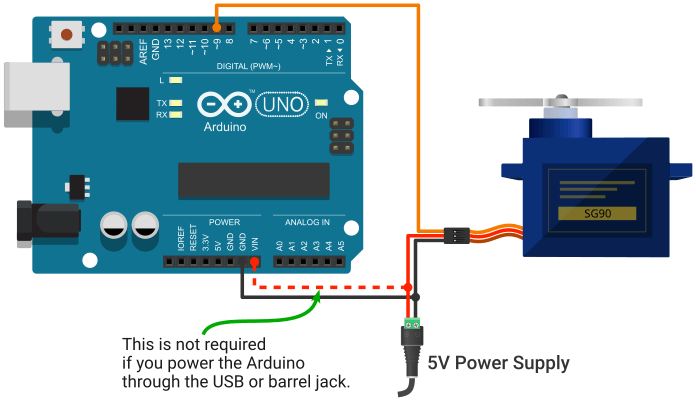
To power the servo motor from an external power supply (5V), connect the servo VCC and GND pin to the power supply +ve and ground terminal respectively. Then couple the ground of the Arduino and the power supply together. The signal pin will remain connected as it was before.
Arduino Servo Control Code
The below program shows you the simplest way to set the position of a servo motor. Also, you can use the below program to easily find the appropriate pulse duration that works for your specific servo.
/*
   Servo control signal generator
   by Kishor, www.circuitgeeks.com
*/
#define servoPin 9

void setup() {
  pinMode(servoPin, OUTPUT);
}

void loop() {
  int pulseWidth = 1500; // 1500μs pulse width = 90 degree
  //20 ms pulse cycle
  digitalWrite(servoPin, HIGH);
  delayMicroseconds(pulse);
  digitalWrite(servoPin, LOW);
  delayMicroseconds(20000 - pulseWidth);
}
If you experiment with the above code you will understand that the loop function is completely engaged to generate signals for only one servo. Including anything else in the loop will interfere with the servo motor signal, causing it to malfunction.
The servo motor signal is very time-sensitive. You will need a good understanding of the Arduino timer and interrupt to handle it properly. Thankfully Arduino has a built-in library (servo.h) to reduce the complexity.
In the below program, you will see the uses of the Arduino servo library.
/*
   Control a Servo using Arduino Servo Library
   by Kishor, www.circuitgeeks.com
*/

#include <Servo.h>

Servo myservo; // create a servo object

void setup() {
  myservo.attach(9); // attaches the servo on pin 9
}

void loop() {
  myservo.write(0); //sets the servo position in degree.
  delay(1000);
  myservo.write(45);
  delay(1000);
  myservo.write(90);
  delay(1000);
  myservo.write(180);
  delay(1000);
}
In the above code, you can see that the servo library is included in the program. Then we need to create a servo object. Servo objects can perform different tasks individually.
Here, I have created a servo object named myservo. In the setup section, I have attached pin no 9 to the servo using the attach function. Then in the loop section, the write() function is used to set the servo position in degree.
The Arduino servo library has many useful functions, I will discuss some of them in the below section.
attach() – attaches an I/O pin to a servo motor.
attach(pin, min, max) – attaches an I/O pin to a servo motor and sets min and max values in microseconds. The default min is 544 μs, max is 2400 μs.
write(degree) – sets the servo position in degree.
writeMicroseconds(ms) – sets the pulse width of the signal in microseconds.
read() – gets the last written servo position as an angle between 0 and 180.
readMicroseconds() – gets the last written servo pulse width in microseconds.
Control Multiple Servo Arduino
Controlling multiple servos is as simple as controlling a single servo. The Arduino servo library supports 12 servos on most Arduino boards and 48 on the Arduino Mega board.
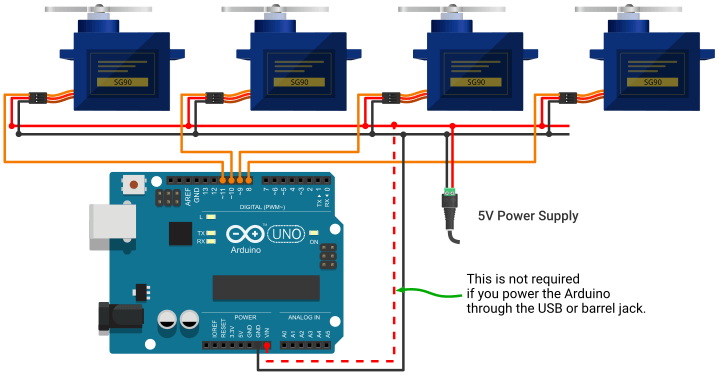
Here, I will use an Arduino Uno board and 4 servo motors. The servos are connected to PINs 8, 9, 10, and 11. I will use a 5-volt 3-ampere power supply to power the servos.
Arduino Servo Code
/*
   Control Multiple Servo with Arduino
   by Kishor, www.circuitgeeks.com
*/

#include <Servo.h>

Servo servo1;
Servo servo2;
Servo servo3;
Servo servo4;

void setup() {
  servo1.attach(8);
  servo2.attach(9);
  servo3.attach(10);
  servo4.attach(11);
}

void loop() {
  // Set All Servo to 0 degree Position
  servo1.write(0);
  servo2.write(0);
  servo3.write(0);
  servo4.write(0);
  delay(1000);

  // Set All Servo to 90 degree Position
  servo1.write(90);
  servo2.write(90);
  servo3.write(90);
  servo4.write(90);
  delay(1000);

  // Set All Servo to 180 degree Position
  servo1.write(180);
  servo2.write(180);
  servo3.write(180);
  servo4.write(180);
  delay(1000);
}
In the above program, you can see that I have created four different servo objects for four servos. Then I have attached servos to PINs 8,9,10 and 11. Now you can use the write() function to set each servo position individually.
You can also use the PCA9685 PWM servo driver to control multiple servos. It only requires 2 Arduino pins to control 16 servos which could save you many pins for other devices or instruments. Read the tutorial below to use a PCA9685 PWM servo driver with Arduino.
Servo Control using a Potentiometer
In this example, I will add a 10k ohm potentiometer (variable resistor) to the circuit so that we can manually adjust the servo’s position. You can apply this learning to projects like robotic arms, Arduino excavators, etc.
If you never used a potentiometer before, you can read my Arduino Potentiometer Tutorial.
Arduino with Servo and Potentiometer Circuit
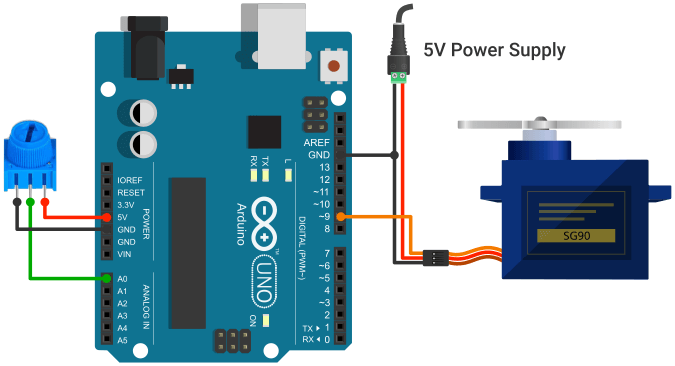
Connect the two outer pins of the potentiometer to the 5V and ground pins of the Arduino. Then connect the middle pin to the Arduino Analog pin A0. The rest of the circuit remains unchanged from the previous setup.
Code – Arduino Potentiometer
/*
   Manually control a Servo using Potentiometer
   by Kishor, www.circuitgeeks.com
*/

#include <Servo.h>

Servo myservo;

int potPin = 0;
int potVal;
void setup() {
  myservo.attach(9);
}

void loop() {
  potVal = analogRead(potPin);
  int angle = map(potVal, 0, 1023, 0, 180);
  myservo.write(angle);
  delay(15);
}
In the above program, you can see that I have created two variables to hold the potentiometer pin number and value.
In the loop section, we read the pot value and mapped that data between 0 to 180 degrees. Then we pass that value to the servo write() function to set the position.
