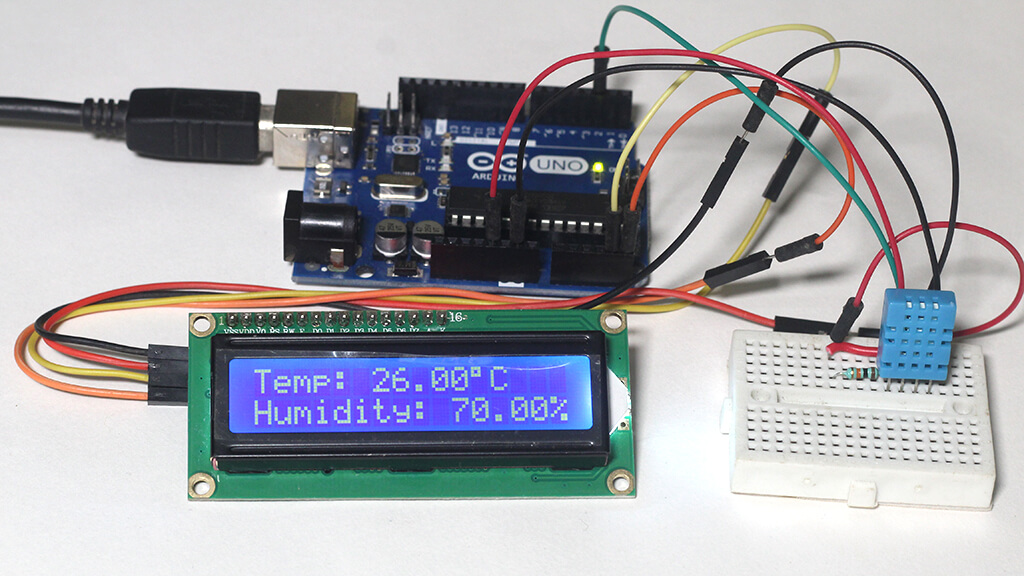
Using an LCD display can give you an advantage in your Arduino project. The LCD can display some useful information related to your project. For example, you can build a distance measurement system that shows the distance on an LCD, or create a simple project that displays a custom message.
Table of Contents
A 16×2 character LCD can display 32 characters – 2 lines with 16 characters each. It requires very little SRAM on your Arduino and has a fast refresh rate. You can use it to display project data such as sensor readings, messages, or status updates in a clean and minimalistic way.
In this tutorial, I will show you how to use a 16×2 character LCD display with Arduino. You will learn how to print text, blink text, scroll text, and display custom characters.
Components needed for Arduino LCD Display Tutorial
| 16×2 Character LCD x1 | Amazon / AliExpress / Baggood |
| Arduino UNO Rev3 x1 | Amazon / AliExpress / Baggood |
| Breadboard x1 | Amazon / AliExpress / Baggood |
| Jumper wires ~ 10 | Amazon / AliExpress / Baggood |
| 10 kΩ potentiometer x1 | Amazon / AliExpress / Baggood |
Understanding the 16×2 Character LCD Display
Character LCDs are available in many different sizes (16×2 or 1602, 20×4 or 2004, etc.). Most of them use the same HD44780 parallel interface LCD controller from Hitachi. So you can easily modify the code slightly, and it will work with other LCDs.
Each character is made up of a 5×8 dot matrix (5 pixels wide × 8 pixels tall). Some LCDs have a 5×10 dot matrix for taller characters, but 5×8 is most common. We can control each pixel to create our own custom characters on the display.
16×2 Character LCD Pinout
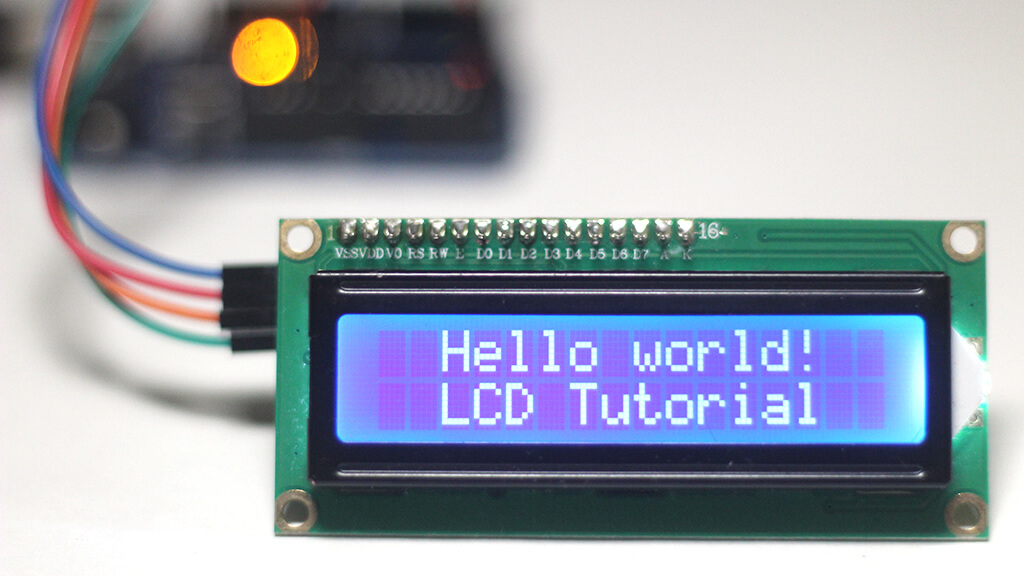
The 16×2 LCD has 16 pins and can operate in 4-bit mode (using 4 data lines) or 8-bit mode (using 8 data lines). The pin count starts from left to right. The first pin on the left is VSS, followed by VCC, V0, RS, R/W, EN, D0 to D7, and finally the Anode and Cathode.
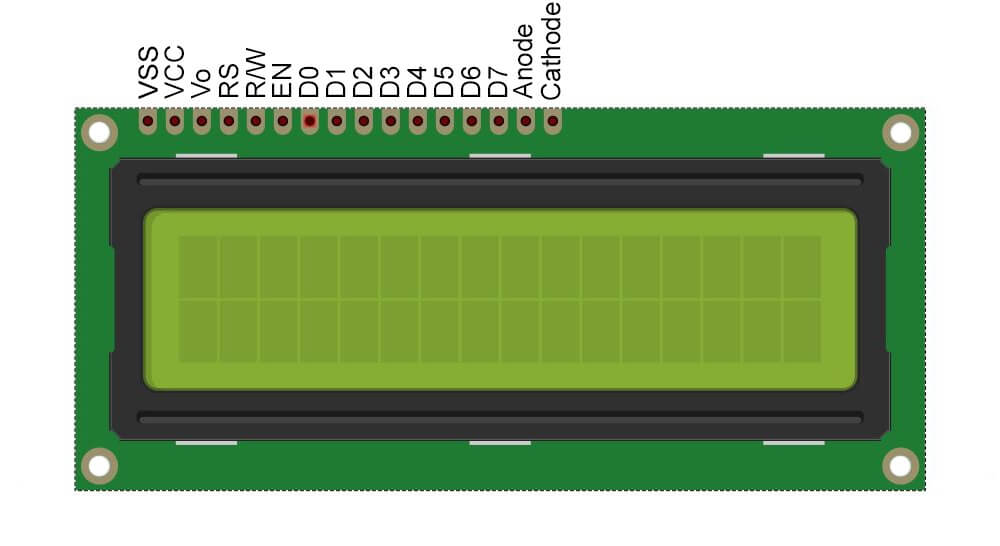
A brief description of each pin is given below.
VDD/VCC & VSS: These two pins are for the power supply. You have to provide a 5V power supply through these two pins. Connect VDD/VCC to the +ve end of the power supply and the -ve end to VSS.
V0/VEE: This pin controls the contrast of the LCD. Connect a 10 kΩ variable resistor (potentiometer) to this pin.
RS: Register Select pin. The basic 16×2 character LCD has two types of registers: the command register and the data register. Logic 0 at RS selects the command register, and Logic 1 selects the data register. When the data register is selected, input from D0–D7 is treated as display data. When the command register is selected, the input is treated as a command.
R/W: Read/Write pin. This pin allows us to select whether to read data from the LCD or write to it. A HIGH signal enables the read operation, and a LOW signal enables the write operation. In most cases, the read operation is never used, and the pin is typically connected to GND to keep the LCD in write mode.
EN: Enable pin. It is used to latch data into the LCD. A HIGH-to-LOW pulse on this pin tells the LCD to read the data present on the data lines (D4–D7 in 4-bit mode or D0–D7 in 8-bit mode). It acts like a trigger – the LCD only processes the command or data when it detects this pulse.
D0 – D7: These are 8-bit data pins. Commands and data are sent through these lines. In 4-bit mode, only D4 to D7 are used.
LED+ (A) & LED– (K): These pins control the backlight of the LCD. Connect a 5V power source through a current-limiting resistor (200-300 Ω). To adjust brightness, you can connect a variable resistor (potentiometer) in series with the backlight.
Connect a 16×2 LCD Display to Arduino UNO
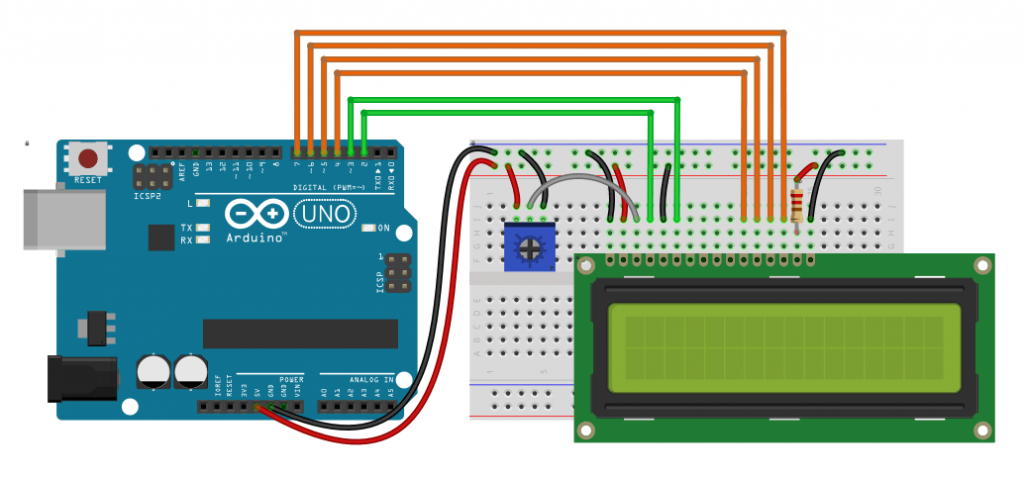
Connecting a 16×2 LCD Display to Arduino UNO is very simple. Follow thise step by step instruction below to connect the 16×2 LCD Display to Arduino board.
Starting from the left, we have two power supply pins: VCC and VSS. Connect VCC to the +5V pin on the Arduino and VSS to GND.
Next, we have the contrast control pin (V0/VEE). Connect it to the 5V line in series with a resistor (1-2 kΩ), or use a potentiometer (10 kΩ) to control the contrast manually.
To use a potentiometer, connect its outer pins to 5V and GND, and connect the middle pin to V0.
Then you have the three control pins: RS, R/W, and EN. Connect RS to Arduino pin 2, R/W to GND, and EN to Arduino pin 3.
The next eight pins are data pins (from D0 to D7). You can connect these pins to any Arduino digital pin. In this tutorial, we’re using the LCD in 4-bit mode, so we will connect pin D4 to D7 to arduino pin 4, 5, 6, 7 respectively.
Finally, the last two pins on the right are for the LCD backlight: Anode (A) and Cathode (K). Connect the anode to +5V through a 220Ω resistor in series, and the cathode to GND. You can also use a potentiometer here to manually adjust the backlight brightness.
Note:- If you want to use the 8-bit mode, simply connect the remaining four data pins (D0 to D3) to four Arduino digital pins and update the code accordingly.
Technically, 8-bit mode is faster since all 8 data bits are sent at once. But, in practice, the speed difference is hardly noticeable.
Arduino Code for 16×2 LCD Display
We are using the Arduino LiquidCrystal library to control our LCD. It’s a great library for interfacing LCDs with Arduino and comes pre-installed with the Arduino IDE.
Before diving into the programming, let’s run the sketch below to test the display.
#include <LiquidCrystal.h>
LiquidCrystal lcd(2, 3, 4, 5, 6, 7);
void setup() {
   lcd.begin(16, 2);
}
void loop() {
   lcd.setCursor(0, 0);
   lcd.print("Hello,Welcome to");
   lcd.setCursor(0, 1);
   lcd.print("Circuit Geeks");
}
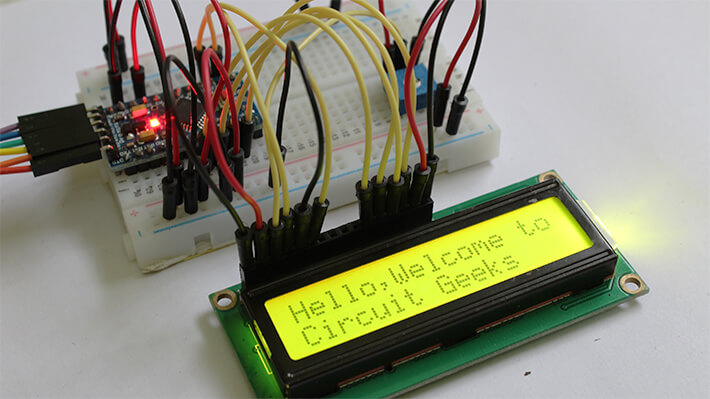
After successfully uploading the code to the Arduino board, your LCD will look like below.
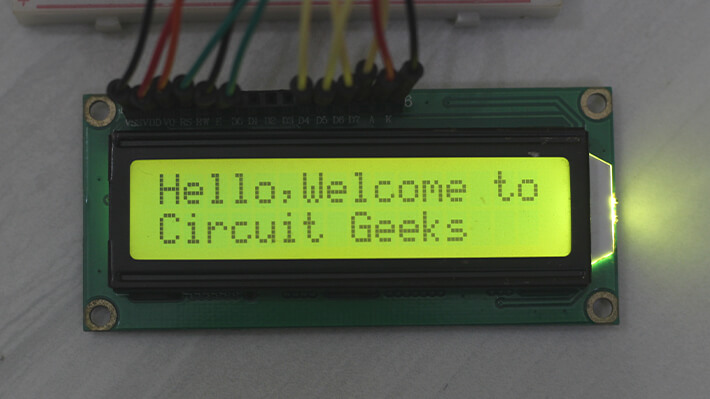
If your display shows nothing, double-check the pin connection and adjust the potentiometer properly. It should then work perfectly.
If your display works correctly, take a closer look at how the LiquidCrystal library works.
Initialization & Setup
Include the library in the program
#include <LiquidCrystal.h> // Includes the library into the programYou can create an LCD object using the LiquidCrystal() function. You can name it anything, like lcd1, lcd2, mylcd, etc., but you need to use the name throughout the program.
Basic syntax for this function would look like this
LiquidCrystal(rs, enable, d4, d5, d6, d7); // 4-bit mode
LiquidCrystal(rs, rw, enable, d4, d5, d6, d7); // 4-bit mode
LiquidCrystal(rs, enable, d0, d1, d2, d3, d4, d5, d6, d7); // 8-bit mode
LiquidCrystal(rs, rw, enable, d0, d1, d2, d3, d4, d5, d6, d7); // 8-bit mode
Use the actual Arduino pin number in place of rs, rw, enable, d4, d5, d6, d7. For example, I will use the function like below in my program.
LiquidCrystal lcd(2, 3, 4, 5, 6, 7);Then we need to initialize the display with row and column parameters. It is generally used in the setup section of the code.
We need to initialize the display before doing any task, so place this at the top inside the setup section of the code. begin() needs to be called before any other LiquidCrystal library commands.
begin(cols, rows, charsize) // Initializes with given columns and rows and charsizecharsize is optional; it specifies the size of a single character on the display. Use LCD_5x8DOTS for 5×8, LCD_5x10DOTS for 5×10. The default is LCD_5x8DOTS.
Example
lcd.begin(16, 2); // Initializes with 16 columns and 2 rows
lcd.begin(20, 4, LCD_5x10DOTS); // Initializes with 20 columns, 4 rows and 5×10 matrix
Text Display
The print() function is used to print text, integers, or floats to the display.
Basic syntax for this function is:
print(data); // Prints text, integers, or floats to the display.
print(data, BASE); // print numbers in different bases.
Examples
lcd.print("Hello world !"); // Prints Hello World !
lcd.print(12345); // Prints 12345

lcd.print(31, BIN) // prints “11111”
lcd.print(31, HEX) // prints “1F”
lcd.print(31, OCT) // prints “37”
The write() function is used to display a character to the LCD. The basic syntax for this function is:
write(byte); // Writes a single character (useful for custom characters).We will discuss more on this function in the Arduino LCD custom character section.
Cursor Positioning
setCourser() is used to position the cursor at any place on the display.
Basic syntax for this function is:
setCursor(col, row); // Sets cursor at specified column and row.You can use the home() function to set the cursor at the home location, i.e top left corner of the LCD.
home(); // Moves cursor to the top-leftRun the code below, and you will get a clear idea of how the setCourser() and home() function works.
#include <LiquidCrystal.h>
LiquidCrystal lcd(2, 3, 4, 5, 6, 7);
void setup() {
  lcd.begin(16, 2);
}
void loop() {
  lcd.setCursor(7, 1);
  lcd.print("Hello");
}
Note that the columns and row count start from 0. So (0,0) would be the first place of the display, and (15,1) would be the last place for a 16×2 display.
Display Control
You can use the clear() function to clear both the display buffer and the display output. It also resets the cursor position to the home location.
clear(); // Clears the display and moves cursor to home.Take a close look at the code below, and you will understand how the clear() function works.
#include <LiquidCrystal.h>
LiquidCrystal lcd(2, 3, 4, 5, 6, 7);
void setup() {
  lcd.begin(16, 2);
}
void loop() {
  lcd.setCursor(0, 0);
  lcd.print("Hello,welcome to");
  lcd.setCursor(0, 1);
  lcd.print("CircuitGeeks.");
  delay(1000);
  lcd.clear();
  lcd.setCursor(0, 0);
  lcd.print("Follow us on");
  lcd.setCursor(0, 1);
  lcd.print("Facebook,Twitter");
  delay(1000);
  lcd.clear();
  lcd.setCursor(0, 0);
  lcd.print("and Instagram.");
  lcd.setCursor(9, 1);
  lcd.print("Thanks");
  delay(1000);
  lcd.clear();
}
You can turn the display on and off using the display() and noDisplay() functions without clearing the display buffer. This means when you turn the display back on, the previous content will still be visible.
display() // Turns display on
noDisplay() // Turns display off (content preserved).
The complete sketch is given below.
#include <LiquidCrystal.h>
LiquidCrystal lcd(2, 3, 4, 5, 6, 7);
void setup() {
   lcd.begin(16, 2);
}
void loop() {
  lcd.setCursor(0, 0);
  lcd.print("Hello, world!");
  lcd.noDisplay();
  delay(500);
  lcd.display();
  delay(500);
}
Cursor Control
cursor() and noCursor()
This function creates a visible cursor (an underscore line) below the next character to be printed on the display.
cursor() // Shows the cursor.
noCursor() // hides the cursor.
lcd.cursor() turns the cursor on and lcd.noCursor() turns the cursor off. Using these two functions, we can create a blinking cursor.
#include <LiquidCrystal.h>
LiquidCrystal lcd(2, 3, 4, 5, 6, 7);
void setup() {
  lcd.begin(16, 2);
  lcd.print("cursor ");
}
void loop() {
  lcd.cursor();
  delay(500);
  lcd.noCursor();
  delay(500);
}
blink()
The blink() function creates a blinking block-style LCD cursor at the position where the next character will be printed. The noBlink() function turns the cursor off.
blink(); // Enables blinking cursor.
noBlink(); // disables blinking cursor.
lcd.blink() turns the cursor on and lcd.noBlink() turns the cursor off.
Text Direction & Scrolling
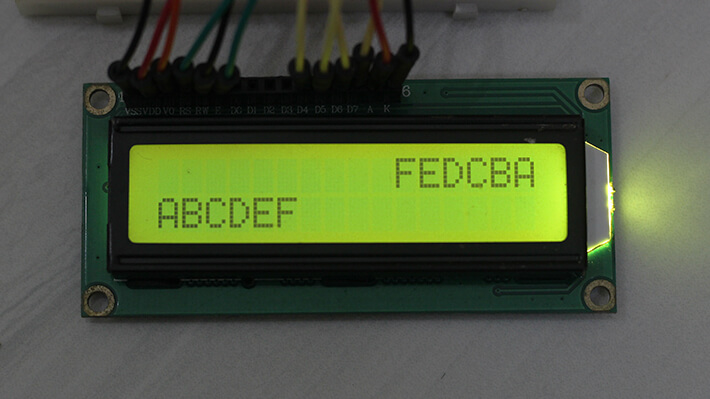
The liquid crystal library gives us the option to set the text printing directions. The display prints the text from left to right by default. You can use the function below to change the text printing directions.
leftToRight() // Sets text printing direction left to right.
rightToLeft() // Sets text printing direction right to left.
Test the code below.
#include <LiquidCrystal.h>
LiquidCrystal lcd(2, 3, 4, 5, 6, 7);
void setup() {
  lcd.begin(16, 2);
  lcd.setCursor(15, 0);
  lcd.rightToLeft();
  lcd.print("ABCDEF");
  lcd.setCursor(0, 1);
  lcd.leftToRight();
  lcd.print("ABCDEF");
}
void loop() {
}
You can also scroll the printed text from left to right or right to left using the functions below.
scrollDisplayLeft() // Scrolls entire display content to left
scrollDisplayRight() // Scrolls entire display content to right
The scrollDisplayLeft() function scrolls the contents of the LCD one step to the left, and the scrollDisplayRight() will scrolls the contents to the right.
Example
#include <LiquidCrystal.h>
LiquidCrystal lcd(2, 3, 4, 5, 6, 7);
void setup() {
  lcd.begin(16, 2);
}
void loop() {
  lcd.setCursor(0, 0);
  lcd.print("Hello World!");
  lcd.scrollDisplayLeft();
  delay(200);
}
The autoscroll() function automatically shifts the entire display to the left each time a new character is printed. The cursor stays in place, but the text appears to move.
Use the noAutoscroll() function to disable the autoscroll behaviour.
autoscroll() // enables automatic left scroll when printing text.
noAutoscroll() // disables automatic left scroll when printing text.
Custom Characters
The createChar() function is used to create custom characters for the LCD. The HD44780 controller has a CGRAM of 64 bytes, which can store up to 8 custom characters, each based on a 5×8 pixel grid.
The syntax for this function is:
createChar(location, data);The location specifies where to store the character (from 0 to 7), and data is an array of 8 bytes, each representing a row of pixels.
We will discuss more about this function later in the tutorial.
So you get the basic idea of how the LiquidCrystal library works. Now, take a look at the program below – it covers almost everything you need to work with the LCD.
#include <LiquidCrystal.h>
LiquidCrystal lcd(2, 3, 4, 5, 6, 7);
void setup() {
  lcd.begin(16, 2);
}
void loop() {

  // Print Simple Text
  lcd.setCursor(0, 0);
  lcd.print("Hello,Welcome to");
  lcd.setCursor(0, 1);
  lcd.print("Circuit Geeks");
  delay(1000);
  lcd.clear();

  // Print with different Base
  lcd.print("Binary ");
  lcd.setCursor(13, 0);
  lcd.print(31, BIN);  // prints “11111”
  delay(500);
  lcd.clear();
  lcd.print("Hexadecimal ");
  lcd.setCursor(13, 0);
  lcd.print(31, HEX);  // prints “1F”
  delay(500);
  lcd.clear();
  lcd.print("Octal ");
  lcd.setCursor(13, 0);
  lcd.print(31, OCT);  // prints “37”
  delay(500);
  lcd.clear();

  // Printing direction
  lcd.setCursor(15, 0);
  lcd.rightToLeft();
  lcd.print("ABCDEF");
  lcd.setCursor(0, 1);
  lcd.leftToRight();
  lcd.print("ABCDEF");
  delay(1000);
  lcd.clear();

  // setCursor() & home()
  lcd.setCursor(7, 1);
  lcd.print("Hello");
  delay(1000);
  lcd.clear();
  lcd.home();
  lcd.print("Hello");
  delay(1000);
  lcd.clear();

  // Scroll Display Right
  for (int i = 0; i <= 16; i++) {
    lcd.setCursor(0, 0);
    lcd.print("Hello World!");
    lcd.scrollDisplayRight();
    delay(200);
  }
  lcd.clear();

  // Print a Variable
  lcd.print("Value of var is");
  int var = 20;

  for (int i = 0; i <= 10; i++) {
    lcd.setCursor(7, 0);
    lcd.print(var);
  }
  lcd.clear();
}
Arduino LCD Custom Character
You’ve already learned that the createChar() function is used to create custom characters on the display. Now, I will show you exactly how to create and store a custom character in the HD44780’s CGRAM and display it on the LCD.
To create a custom character, first, we need to define a byte array for that character.
For example, to create a byte array for a custom character like the example below:
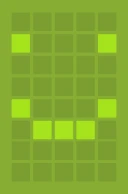
Go through it row by row, placing 1 for an ON pixel and 0 for an OFF pixel. Do this for all eight rows.
You’ll end up with an array like this:
00000,
10001,
00000,
00000,
10001,
01110,
00000,
00000,
You can store the data in an array using binary values like this,
byte smiley[] = { B00000, B10001, B00000, B00000, B10001, B01110, B00000, B00000 };Or use the hexadecimal equivalents like this:
byte smiley[] = { 0x00, 0x11, 0x00, 0x00, 0x11, 0x0E, 0x00, 0x00 };There are also some online and offline tools available to visually draw custom characters, and they will generate the binary or hex code for you. I recommend using this online tool: LCD Custom Character Generator.
Now upload the code below to your Arduino board and see the output.
LCD Custom Character Example Code for Arduino
#include <LiquidCrystal.h>
// Creates an LCD object. Parameters: (RS, E, D4, D5, D6, D7)
LiquidCrystal lcd(2, 3, 4, 5, 6, 7);
// Make custom characters:
byte smiley[] = {
  B00000,
  B10001,
  B00000,
  B00000,
  B10001,
  B01110,
  B00000,
  B00000
};
void setup() {
  // Specify the LCD's number of columns and rows:
  lcd.begin(16, 2);
  // Create a new characters:
  lcd.createChar(0, smiley);
  // Clears the LCD screen:
  lcd.clear();
}
void loop() {
  // Print all the custom characters:
  lcd.setCursor(0, 0);
  lcd.write(byte(0));
}
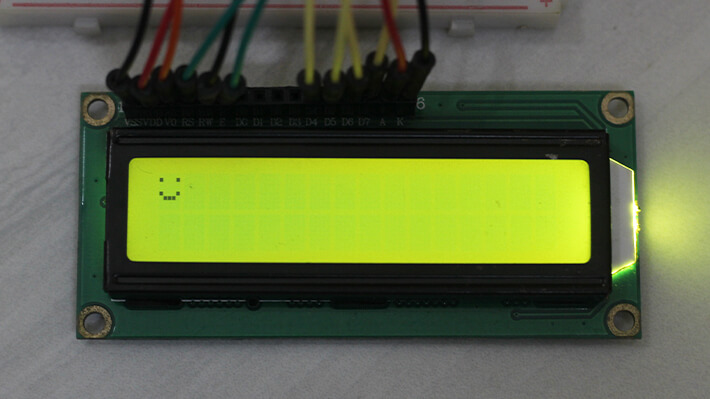
You will get an output like this.
Explaining the code
You can see that I have created a byte array for my custom character.
byte smiley[] = { B00000, B10001, B00000, B00000, B10001, B01110, B00000, B00000 };In the setup section, we use the createChar() function to load the custom character data into the LCD’s CGRAM memory:
lcd.createChar(0, smiley);Then, in the loop section, we use the write() function to display that custom character.
lcd.write(byte(0));That’s it! You can now create your custom character and display it.
In the example below, I’ll create and print multiple useful custom characters on the display.
Arduino LCD custom character code
#include <LiquidCrystal.h>

// Creates an LCD object. Parameters: (RS, E, D4, D5, D6, D7)
LiquidCrystal lcd(2, 3, 4, 5, 6, 7);

// Make custom characters:
byte smiley[8] = {B00000,B10001,B00000,B00000,B10001,B01110,B00000,B00000};
byte man[8] = {B00000,B01110,B10001,B01110,B00100,B11111,B00100,B11011};
byte music[8] = {B00001,B00011,B00101,B01001,B01001,B01011,B11011,B11000};
byte heart[8] = {B00000,B01010,B11111,B11111,B01110,B00100,B00000,B00000};
byte speaker[8] = {B00001,B00011,B01111,B01111,B01111,B00011,B00001,B00000};
// Using Hex data
byte bell[8] = {0x00,0x04,0x0E,0x0E,0x0E,0x1F,0x04,0x00};
byte pie[8] = {0x00,0x1F,0x0A,0x0A,0x0A,0x13,0x00,0x00};
byte ohm[8] = {0x00,0x0E,0x11,0x11,0x0A,0x1B,0x00,0x00};

void setup() {
  // Specify the LCD's number of columns and rows:
  lcd.begin(16, 2);
  // Create a new characters:
  lcd.createChar(0, smiley);
  lcd.createChar(1, man);
  lcd.createChar(2, music);
  lcd.createChar(3, heart);
  lcd.createChar(4, speaker);
  lcd.createChar(5, bell);
  lcd.createChar(6, pie);
  lcd.createChar(7, ohm);
  // Clears the LCD screen:
  lcd.clear();
  lcd.setCursor(0, 0);
  lcd.print("Custom Caracter");
}
void loop() {
  // Print all the custom characters:
  lcd.setCursor(0, 1);
  lcd.write(byte(0));
  lcd.setCursor(2, 1);
  lcd.write(byte(1));
  lcd.setCursor(4, 1);
  lcd.write(byte(2));
  lcd.setCursor(6, 1);
  lcd.write(byte(3));
  lcd.setCursor(8, 1);
  lcd.write(byte(4));
  lcd.setCursor(10, 1);
  lcd.write(byte(5));
  lcd.setCursor(12, 1);
  lcd.write(byte(6));
  lcd.setCursor(14, 1);
  lcd.write(byte(7));
}
Summary
In this tutorial, you learned how to display different types of text, numbers, characters, and even custom characters on the LCD. However, one thing you may have noticed is that the LCD uses many I/O pins on the Arduino. To reduce pin usage, you can use an Arduino I2C LCD display in your project.
In my Arduino I2C LCD tutorial, I’ve explained how to connect and use an I2C LCD with Arduino.
I hope you found this tutorial helpful. If you did, please subscribe to our weekly newsletter to receive more such content in your inbox.
