In many projects where we need to add a sound, we need a buzzer. Buzzer is the most easy and cost-effective way to add sound to your Arduino projects. Using a buzzer we can create projects like timer, stopwatch, fire alarm, siren, etc.
In this tutorial, you will learn how to use a buzzer or piezo speaker in your Arduino projects. You will also learn how to use tone() and noTone() functions to create a tone.
How Buzzer Works
There are two types of buzzers, active buzzers, and passive buzzers. Most of the active buzzer works at a voltage range of 3.3V – 5V and generate only one sound frequency. It can only generate a sound of fixed frequency when you provide the required voltage to it.
On the other hand, you have a passive buzzer. Passive buzzers can generate a sound of a wide frequency range (> 31Hz). It needs a fixed frequency signal to generate a specific tone. This tone can be changed by changing the input signal frequency. We can use a PWM signal or Arduino tone() function to generate this type of input signal and generate a tone.
Connecting Buzzer to The Arduino Board
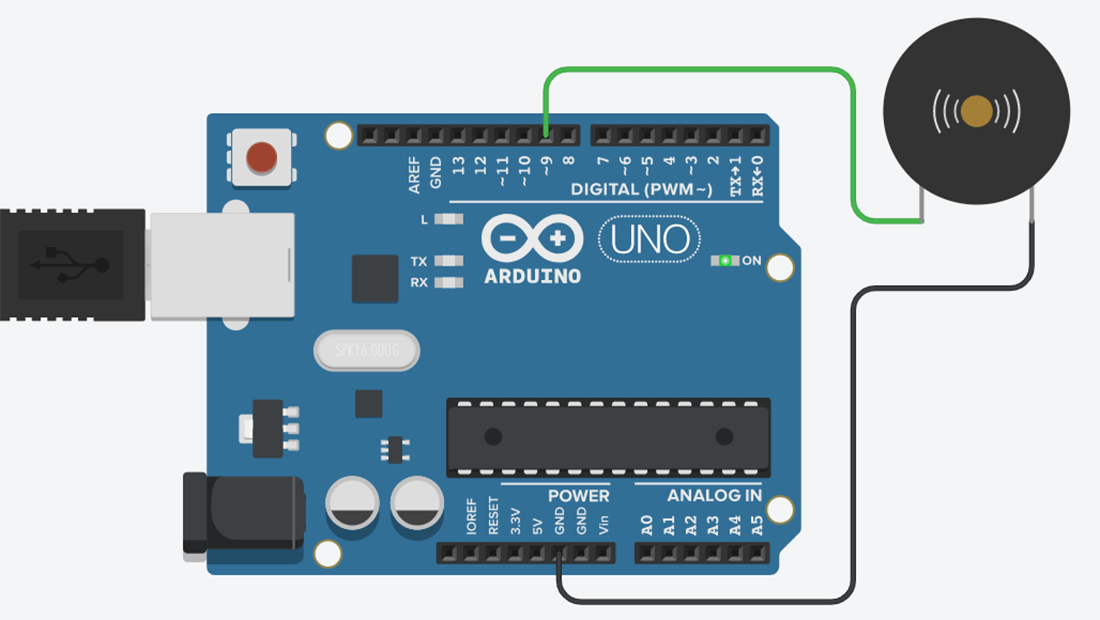
If you have the buzzer it has two legs. One is positive and one is negative. Connect the positive pin to any Arduino PWM pin (we will use pin 9). And if you have an Arduino buzzer module you can find three pins there. Positive, negative, and signal pin. Connect the positive pin to the Arduino 5v pin, the negative pin to the Arduino ground pin, and the signal pin to an Arduino PWM pin (pin 9).
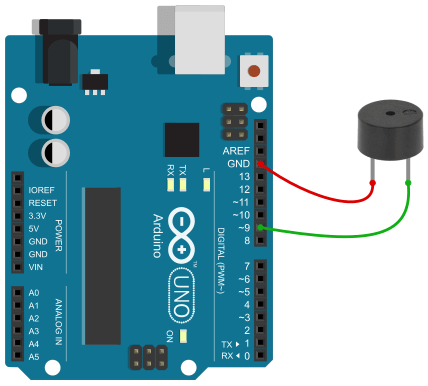
Arduino Buzzer Code and Explanations
A high signal to the buzzer pin (pin no 9) generates a simple tone and a low signal will turn it off. The below code will turn the buzzer on for 500 ms and then turn it off for 500ms. It will generate a bip – bip – bip sound.
digitalWrite(buzzerPin, HIGH);
delay(500);
digitalWrite(buzzerPin, LOW);
delay(500);
We can control the intensity of the tone using a PWM signal. analogWrite(pin, 127) will turn the buzzer on at its ½ intensity.
analogWrite(buzzerPin, 127);
delay(500);
analogWrite(buzzerPin, 127);
delay(500);
The complete code is given below. Upload the code to the Arduino and listen to how it sounds.
const int buzzerPin = 9;
void setup(){
  pinMode(buzzerPin, OUTPUT);
}

void loop(){
  analogWrite(buzzerPin, 127);
  delay(500);
  analogWrite(buzzerPin,0);
  delay(500);
}
Buzzer with tone() function
It becomes more interesting when we use the tone() function to control a buzzer. We can get more control over the buzzer tone when we use the tone() function.
The basic syntax for the tone function is given below.tone(pinNumber, frequency) andtone(pinNumber, frequency, duration)
Where pinNumber is the Arduino pin number on which we generate the tone. frequency determines the frequency of the tone in hertz. and duration determines the duration of the tone in milliseconds.
So if we want to generate 500 Hertz tone for 500ms at pin no 9, we will use tone(9, 500, 500)
A call to the noTone() function will stop the tone. The syntax for the noTone() is noTone(pinNumber) where pinNumber represents the pin number that the buzzer is attached.
Arduino Code
const int buzzerPin = 9;
void setup(){
  pinMode(buzzerPin, OUTPUT);
}
void loop(){
  tone(buzzerPin, 500, 500);
  delay(1000);
}
Upload the code to the Arduino and you will get a 500 Hertz tone.
Conclusion
In this tutorial, you learned how to create a tone using a buzzer and Arduino. You also learned about the Arduino tone() function. I hope you like this tutorial.
Share this tutorial with relevant people or groups. Comment below, if you have any doubts or suggestions.
You can also subscribe to our mailing list to get the weekly newsletter to your mailbox.


Is there a way to use both tone() and analogWrite() in the same loop? I would like to control the volume as well as the frequency.